


WireGuard has become increasingly popular as a modern VPN protocol due to its speed, simplicity, and security. It is an ideal VPN solution for both personal and corporate use, standing out with its low latency and robust encryption technology. In this article, we will go over what WireGuard is, why it should be chosen, and how to install it step by step. Additionally, we’ll help improve your website’s SEO performance with optimized content.
WireGuard is a fast and lightweight VPN protocol designed to secure your internet traffic. Compared to older VPN protocols like IPsec or OpenVPN, it is easier to configure and uses modern encryption algorithms. Its small codebase minimizes security vulnerabilities and allows for faster performance. WireGuard works seamlessly on various platforms such as Linux, Windows, macOS, Android, and iOS.
Here are the main reasons to choose WireGuard:
These features make WireGuard an excellent VPN solution for both individual users and businesses.
Now, let’s go through the steps to install WireGuard VPN on a Linux server. The installation process is similar across other platforms as well.
Before installing WireGuard, ensure that your server is up-to-date. Use the following commands to update your system:
sudo apt update && sudo apt upgrade -yWireGuard is available in the official package repositories of many Linux distributions. Install and run WireGuard using the following command:
curl -O https://raw.githubusercontent.com/angristan/wireguard-install/master/wireguard-install.sh chmod +x wireguard-install.sh ./wireguard-install.sh sudo apt install wireguardThis command will install the necessary kernel module and user tools for WireGuard.
After pasting the command provided above into your virtual server, you can simply hit enter without making any changes in the lines marked as enter in the visual below. WireGuard will automatically handle all configurations and adjustments.  At the last step, after hitting enter, you can assign a name to your VPN server in the client name field as shown in the visual below. In this case, we named it “test,” but you can choose any name you prefer. No further changes are required in the fields marked with enter, as the system will automatically adjust the configurations for you.
 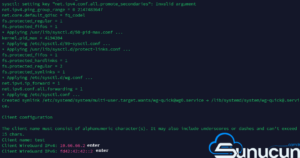 After copying the file path that appears, type cat and paste the file path you copied, then press enter. It should appear as shown in the image below.
  Copy the settings that appear and paste them into the WireGuard VPN configuration section, which can be accessed via the WireGuard website.
Once you have completed the installation of WireGuard, consider the following tips to enhance security:
After installing WireGuard, it’s important to check your DNS settings to prevent DNS leaks. Leaks can compromise your privacy while using a VPN. Adding a secure DNS server to your WireGuard configuration file is recommended. The following example shows how to configure DNS settings using Cloudflare DNS:
[Interface] PrivateKey = YOUR_PRIVATE_KEY Address = 10.0.0.1/24 ListenPort = 51820 DNS = 1.1.1.1, 1.0.0.1This step ensures that your VPN connection routes traffic through Cloudflare DNS, reducing the risk of leaks.
WireGuard is a simple yet powerful VPN solution that combines speed and security. By following the steps outlined in this guide, you can quickly install WireGuard on a Linux server and secure your internet traffic. With its straightforward interface and robust encryption mechanisms, WireGuard is suitable for both individual and corporate use.
For more detailed information, you can check out the official WireGuard installation documentation.