


Plesk Panel is a powerful and user-friendly control panel used for web hosting management. It simplifies server management and allows users to manage websites, email accounts, databases, and many other services. In this article, we will cover what Plesk Panel is, why it should be preferred, and how to install Plesk Panel step by step. We will also discuss the importance of creating SEO-friendly content.
Plesk Panel is a control panel designed for web hosting service providers and website owners. This software works on both Linux and Windows servers, enabling easy management of websites. It brings together many services such as email accounts, databases, SSL certificates, and DNS settings, offering users a comprehensive solution. Additionally, Plesk allows easy access to multiple websites and domains.
The main reasons for Plesk Panel’s popularity are:
With these features, Plesk offers an ideal solution for both individual users and businesses.
Installing Plesk Panel is quite straightforward. You can use this panel to easily manage your websites on your server. Let’s go through the Plesk Panel installation process step by step.
To install Plesk Panel, your system must meet the requirements. To install the latest version of Plesk, pay attention to the following requirements:
yum -y update yum install nano yum -y install wget curl
You can download the installation file for Plesk Panel from the official website or via the command line. To install Plesk on a Linux server, use the following command:
sh <(curl https://autoinstall.plesk.com/one-click-installer || wget -O - https://autoinstall.plesk.com/one-click-installer)
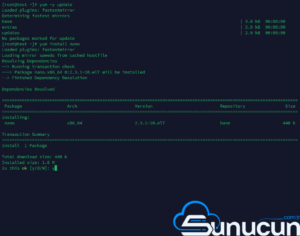
This command downloads the Plesk installation file and starts the installation process. During the installation, you can choose which components to install. If you are installing on a Windows server, download the Windows version of Plesk and follow the installation wizard. After entering the installation command, system requirements will be downloaded and installations will proceed as shown in the image. 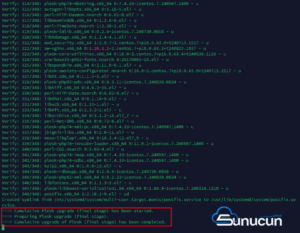
After the installation is complete, you will be asked to enter a license key when you first log in to Plesk. If you do not have a license, you can use Plesk’s trial version or purchase a license. After entering the license key, you can start using the panel fully. 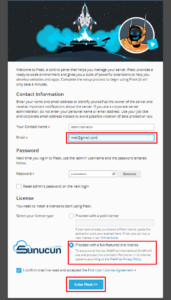
After filling in the necessary information, simply press the Enter Plesk button to complete the installation. You can then proceed to step 4.
After completing the Plesk Panel installation, you need to configure DNS and hosting settings on your server. Plesk allows you to configure DNS settings automatically. To add a new website, follow these steps:
With Plesk Panel, you can easily manage your website and email accounts. To add a website, select the relevant domain from the “Websites & Domains” tab and click “Add Website”. Then, upload your website files.
You can also create email accounts with Plesk. Define and manage email accounts for each domain. Go to the “Mail” tab to create a new email account.
Plesk offers various tools to ensure the security of your website. You can easily install SSL certificates via Plesk to secure your site with HTTPS. You can use either Let’s Encrypt or paid SSL certificates to enhance your site’s security.
To install an SSL certificate:
Plesk Panel allows you to regularly back up and restore your data. Backups prevent data loss in case of issues with your site. You can set up manual or automatic backups via Plesk.
Plesk Panel is a control panel that simplifies server management and offers a wide range of features. With its easy installation and user-friendly interface, it is an excellent solution for both beginners and professionals. In this article, we detailed how to install Plesk Panel step by step. You can use Plesk Panel to simplify the management of your websites and enhance their security.
For more information, you can refer to Plesk’s official documentation.