


OpenVPN is a popular VPN protocol used to secure internet connections and maximize data security. This software plays an important role, especially in business, by facilitating remote work and ensuring data security, making it a preferred solution for both small and large enterprises. In this article, we will explore what OpenVPN is, how it works, and provide a step-by-step guide on how to install it. We will also focus on keyword optimization to ensure SEO compatibility.
OpenVPN is an open-source VPN (Virtual Private Network) protocol. This technology encrypts users’ internet connections, securing them, and allows for secure data exchange between different devices. It offers significant advantages, particularly in terms of security and privacy. OpenVPN is widely preferred due to its robust security protocols and compatibility with multiple platforms.
OpenVPN provides many benefits beyond just ensuring a secure connection. Here are some of its advantages:
These advantages make OpenVPN an ideal choice for both individual users and businesses.
Now, let’s go over how to install OpenVPN step by step. This guide is for installing OpenVPN on a Linux-based server. Before starting the installation, you need to connect to your server via SSH. If you are unfamiliar with how to set up an SSH connection, you can check this guide for assistance.
First, you should ensure that the packages on your server are up to date. Update your system using the following command:
sudo apt update && sudo apt upgrade -yDownload the required files using the following command and automatically begin the installation process.
bash <(curl -fsS https://as-repository.openvpn.net/as/install.sh)

After the installation is complete, you will receive your access information as shown in the image below.

The address in the format ip:port/admin is the management address. Once you log in, you can get more information about OpenVPN management.
After the installation, copy the ip:port URL address provided to you and add it to the section shown below.

After entering the URL address provided to you, you need to fill in the username and password fields as shown below.
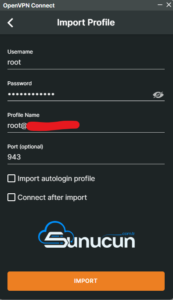
Once you enter the information provided to you after installation, simply click the IMPORT button. Your personal VPN is now active and working without any issues.
After setting up OpenVPN, you can follow these steps to further enhance its security:
Open VPN is an ideal solution for anyone looking to create a secure VPN connection. OpenVPN installation on Linux servers can be completed in just a few steps as outlined above. By following these steps, you can securely protect your data and ensure a secure connection on the internet.
For more information and a detailed guide, visit the OpenVPN Installation article.